Showing posts with label how to. Show all posts

Wednesday, March 17, 2010

Got Inspiration Block - Try This!


I belong to a great Yahoo group – Metal Clay Gallery. Actually, I belong to several great Yahoo groups, but this post came out of a discussion on the MCG group about ‘Art Fear’. There were many interesting contributions, but this one jumped out at me, perhaps because at the moment I am going through a period of lack of inspiration and/or the ability to create what I feel are ‘good’ designs; it was, I think, so genuinely and joyously put that I just had to ask to use it for a post on how to overcome Inspiration Block.

So here it is – from Ann Davis

Note: All images are the sole property of Ann Davis, please do not download or use without obtaining her prior permission

You have a journal...right...every artist must have a journal. I have a dozen or so...some I write and sketch in and some I just draw in.

Ok, once you have your very own special journal get your special favorite pencil or colored ink pen in your hand...sometimes writing in green ink for the day just helps you think...another day it might be purple!! I have a whole pack of colored pens!

Beyond fear most artists need focus!! So I thought I would share the way I get it...maybe it will help somebody focus/think...THINKING is good!! I never do enough of it!!!

So to start.....

List
Make a list of 10 things you are fascinated with right now...it could be ancient alphabets, flowers, pebbles, birds. Art Deco, frogs. the sea....what ever, things you just love.
Leave some room between the listings, there is more to write.

The Special Magic
Now under the listings tell yourself why you are fascinated by each thing, what it's 'special magic' is for you.... I kind of think of it as a magical thought...a magical seed of an idea as it were...for instance, if you say you like birds...then what aspect are you drawn to...feathers, if so...local birds or tropical feathers??....little feet??...they way they swoop in flight?? WRITE IT DOWN and sketch if something pops up, don't ever deny that quick click of an idea.
If it's ancient alphabets...then make a list of the ones you like,
Latin, Greek, what ever...you are going to gather these things UP!!

Get Out
When you have your 10 things done and fleshed out, you need to take your list and get out of the house/studio/bedroom...sometimes just being in the 'same' environment triggers the same old thoughts...go to a library and look up books on each subject you listed and try to find the kinds of things you listed as your magical seeds. Xerox those pages or check out the books.


Ammo Up
Now you have your seed ideas, you need some ammunition. Go to your favorite junk store/craft store/hobby store/nursery where you are going to look for anything that reminds you of those magical aspects...doesn't have to be the same exact thing...like if you listed feathers...you could buy feathers at a craft store but.... they may have some fabric with feathers printed on it that just fits the bill…or...some angel wings…could just be the shape of the feather...pick up little bits and pieces of stuff that catches your eye and stays on your theme.

Take it all home. Lay it out in front of you.

Plant the Seed
Now....Start a new page for each magical seed....so... if you bought feathers or seashells...put them on the page and draw around their shapes or sketch them if you draw well...if you sculpt with polymer, start copying...yes copying exactly what you have in your hand. Often the making of an object gives way to something else in your mind…your hands and the way it feels are part of the magical seed information going into your brain;))...keep writing on that page, the little bits and pieces of the exact aspect that you like about the thing...how it comes together or how it's shaped...the color…the texture...REALLY give it your attention...Now you will know these things inside and out and once you know your subject.....you really own it!
Play Mad Inventor
Next is the fun part...start mixing the pieces...put the feather in the shell or if you picked up a silly plastic frog…put him on the feather or, or put the frog on the shell with the feather sticking up....Start imagining these things as metal clay. (or whatever your medium is) Start LAUGHING!! You should get some really weird ideas...draw them out no matter how funny they seem...these are the seeds of your imagination playing with each other....it's a form of cross fertilization...very good stuff.

If you have really thrown yourself into this exercise you should start having all kinds of silly ideas, a frog covered in ancient alphabets...or a frog with wings...a shell with wings or imprints of the feather all over it. Go with one of your visions...make it a reality...put it into metal clay!!...even if the first thing you make is not perfect, guess what...you are working!!! Keep going!! More than likely you will discover that you need to perfect some other technique to get your 'vision' perfect...throw yourself into it, then when you have mastered it come back to you magical seeds and realize that dream!!

Well anyway, for what it's worth, in a nutshell, that's the way I jumpstart my work.

Now I tend to either take pix or make copies of stuff and glue them into my journal, plus I have acquired so much junk that I could open my own craft store;))hahaha we won't even go into the time I was fascinated by all the variations of raffia out there or my collection of sand from all over the world, or how that looks under a microscope;)

So last week I was mulling over the Masters Register pieces and trying to decide what to make next and I spent several hours going through my journals and ended up spell bound by a section on hand made iron gates...yes I have wonky entries!! and the kuemboo spoon project just popped into my head full blown. So I sketched it out, figured out how I could make it and just threw myself into it while the idea was still hot!!

So there you have it – if you’re like me and going through the doldrums in your artistic world right now, doesn’t that just hype you up? Thank you so much Ann for agreeing to share this on Explore Arts.

And you, the reader, do you keep journals?


What method(s) do you use to keep the creative juices flowing and to turn the ‘everyday’ into a great piece of art?

Do share your experiences here – and feel free to share this wonderful little coaching session on getting out of Inspiration Block too!

See you here next time! On your way out, do take a look at some of Ann’s wonderful work at anndavisstudio.com

Wishing you all lots of inspiration!

Finola

Sunday, November 30, 2008

HOW TO MAKE COLD PORCELAIN

Cold Porcelain is available as a commercially made mix you can buy - but you can also make a similar clay yourself from three simple ingredients. This clay is fun to use, dries super hard and can make solid chunky pieces or wafer thin translucent pieces. You can colour it with paints or paint on it when dry - add glitters, sand, etc and it sticks easily onto wood or glass to decorate items. Varnish to make fully waterproof.

So, let's make cold porcelain -

Recipe

The recipe will be different depending mainly on the brand of glue you use – for this one I used Elmer’s Glue-All – a white pva glue.

Ingredients

2 cups Glue
½ cup water
3 cups cornstarch
2 tablespoons baby oil

Tools

Plastic microwavable bowl
Strong wooden spoon or flat stick
Cup and Tbs measures
Spatula or blunt knife

Method
Put all the ingredients in your plastic microwavable bowl, stir together until they are fairly well combined.
Note, you don’t need to sieve the cornstarch and you don’t need to mix until it’s really even – just break up any big lumps.
Pop it in the microwave -

NOTE – all microwave ovens are different – some cook super fast, some very slow.

Your cooking times will also depend also on the size of your bowl in relation to the amount of clay you are making – big bowl, little clay, it may take longer, big bowl, lots of clay may be slow at first then cook really fast once it gets hot.

So, err on the slow side at first – I do 1 min @ 10% or the lowest setting first – if it is barely warm I move to 1 min @ 30%.
Each time you finish a microwave session, take the bowl out and stir the clay – as it cooks the edges with harden first so it’s important to scrape them and stir them in.
You don’t need to make a smooth paste, just break up lumps and pull in the edges to into the mix.

When the mix starts to get significantly thicker, harder to scrape off and stir, shorten your microwave times to 45s
It should take about 4-5 minutes in all to get to the point where the mix sticks to the spoon/stick. As it gets thick enough to hold it’s own shape but will still stick to your finger when you touch it, shorten your times to 30s


When it's ready it will hold fairly well together when you mix it in the bowl and it will not stick to your fingers anymore when you press your fingers in.
BUT it's okay to take it out when it's still a little sticky and knead in more cornstarch: In general, it's better to UNDERcook a little than to overcook.
Now you are ready to take it out of the bowl and knead it.

Sprinkle a generous layer of cornstarch on your table and over your hands.
Turn out your lump of clay, scrape the sides and bottom of the bowl as best you can, then sprinkle some cornstarch in the bowl and scrape some more – the rest will come off more easily as the cornstarch dries it.
Don’t worry if some is left back – let it dry and then it will peel off very easily – this is my recommended clean up method.

If you choose to wash out your bowl, make sure you allow a lot of water to flow so the gluey mix does not clog your drains.

But, don’t clean up now – you need to pay attention to finishing your clay – so, cover your hands in lots of cornstarch and knead your dough.

Caution – your clay may be very hot – so check first before you plunge your hands in. But start kneading as soon as it reaches a temperature you can handle – if you leave it too long, a crust will start to form.

Dust your hands - no, smother them in cornstarch - and start to knead.

You’ll find it easily kneads into smooth consistency dough. Pull it apart to get the insides to the outside and make sure the whole dough get mixed in during kneading.
Look out for when it starts to have ‘cracks’ that don’t stick together – it’s ready at that point or when it forms a nice roundish lump of clay that doesn’t stick to you or the table.

Put it in a plastic bag and tie it.
NOTE: always keep clay you are not using in plastic sealed off from the air – this clay dries quickly and when it half dries, it is difficult to form good shapes from it, so keep it wrapped up.

Colouring The Clay


You can easily colour this clay using any water based paint - acrylic, poster, watercolour, food colouring will all work. Some oil paints will also work but they may cause it to dry very slowly or may not mix in and will exude oil so be careful and try it out on a small bit first.

NOTE: Opaque paints will make your clay more opaque, translucent paints will help keep it see-through if you want to make decorations that the light will shine through.
Whatever paint you choose, take a lump of clay, make a small well in the middle by pushing down on the clay with your fingers. Squeeze a little paint into the well and then wrap the edges of the clay over the well.
Don’t worry if paint sneaks out – as long as it doesn’t spurt out all over you, just keep pulling the clay and wrapping it over itself in any random way and the colour will mix in.
Just keep an eye out for the clay getting too wet from the paint – if so, pick up any cornstarch or drier bits of clay left on the table with the clay or if necessary, sprinkle more cornstarch onto the clay.

You’ll find it can get quite wet without becoming sticky if it is made well. And at the other end of the spectrum, don’t mix it until it starts to dry out either! You can add in more paint i.f you want a stronger colour
You can choose to mix until it’s a uniform colour or stop when it is still marbled with natural and your colour. You can marble two or three colours together also – just roll out two coils and twist them around each other, then fold and twist and roll, fold, twist and roll over and over until you get to a marble pattern you like.

When you’re done colouring, and marbling, pop the clay in a plastic bag and tie it off.

Let us know if you try this out - and if you have any questions - just pop it all in the comments box - love to hear from you.

If you enjoyed this tutorial please help publicize the blog by clicking on the ShareThis button below or or sending your friends to have a look - and why not sign up for the RSS feed or to receive email notification of new posts!

Copyright:
You may download this tutorial for personal use or use in your classroom - if you wish to use it for any other purpose, please use the contact form to ask permission.

Sunday, November 9, 2008

Tubecoiled Screwpine Video Demo

Our Artist and Demonstrator
Daphne Stephens of Choiseul, St. Lucia is a traditional crafter who makes tubecoiled “Screwpine” basketry. This is one of the traditional forms of basketry found in St. Lucia and Daphne is considered to be the island’s most accomplished practitioner of this craft – her baskets are tightly woven with fine detailing and last decades in full use without showing much wear and tear at all. In fact, Daphne is the only basket-maker on the island who does this technique to such a level of tightness, detail and quality. She has always expressed a keen interest in teaching but the youth unfortunately don’t see being a basket-maker as a future for them.

A Wish
Nonetheless, one of the things I would like to achieve someday, is to find a small group of interested persons – youth and others - and have Daphne be part of series of training workshops where she would teach and pass on her skills and participate also in learning ways to introduce contemporary designs, decorative techniques and adaptations to other décor and fashion uses to broaden the customer base. I’m hoping I’ll find an interested funding agency and we’ll manage to turn what may soon otherwise only be an historical tradition, into a new vibrant living tradition.

About the Craft
The screwpine, pandanus tectoris, locally known as “palama” is often grown as a wind-shield as its dense growth defies even hurricane force winds. The name screwpine comes from the way the central stem grows in a spiral or screw. The leaves naturally dry on the plant and turn a lovely soft brown but most weavers also pick green leaves, boil and bake them to achieve a cream colour as well. Other preparation includes removal of the central rib and the outer edges of the leaves which are lined with prickles: This is done with a needle or similar object, run along the leaf, which separates easily along its grain. Pricked fingers are not uncommon! Leaves are then split again into appropriate sizes for the weaving and theAlthough St. Lucian traditional crafters don’t dye these fibres, you can dye them with RIT dyes, which are strong enough to get past the waxy surface of the leaves. You can also apply acrylic paints or wood stains on a completed piece to achieve a variety of decorative effects.

The Video Clips

These clips show a few of the techniques she kindly demonstrated to my Art students during a tour we made around just some of St. Lucia’s arts and crafts interests. The clips don’t show a whole basket being made but we have a beginning clip, adding in new weaving strands and finishing off. Perhaps I will be able to film her making a small items from start to finish or at least showing a few more techniques to share here, but for now, I hope you enjoy these.


Starting Off


Adding in a New Strand


Finishing Off

If you like our tutorials please consider subscribing by RSS or email
You can also promote our site by clicking the ShareThis button below
and by telling your friends about the site and sending them to visit us - thanks!

Wednesday, October 8, 2008

Dolphin Tutorial

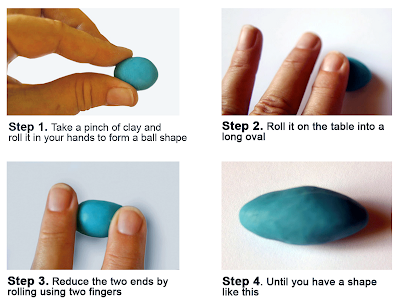
Hand Sculpting with your Fingers and a Toothpick

By Finola Prescott 
Skill Level: Beginner
 
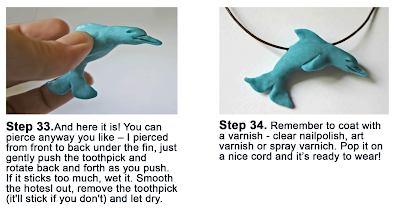
Living in the Caribbean small islands means you often can't get quite what you want to work with, so I try to come up with ways to do things with alternate tools and materials. In this tutorial we'll make a clay dolphin (about 2"x1.5") using just our fingers and a toothpick.
This method works well for a any kind of clay – polymer, ceramic, air dry or cold porcelain; for this tutorial, we use cold porcelain which I like for various things; it's ability to dry very hard without needing any cooking, it takes colour easily mixed into the clay as well as painted on after and that it dries rock hard even when very thin. But it's not without some limitations; what I've found are first that it takes detail reluctantly – you often have to go back as it is drying and redefine details as it tends to bounce back from where you put it into a nice rounded pillow-like shape; that's all well and good if you want a pillow, if you want a knife edge, persist at persuading it and it will eventually agree to do what you want. Secondly, although I'm always fascinated at how hard this air-dries, it does need some kind of varnish applied if it is to be used as jewelry, keyrings or anything that will get damp and last that it doesn't marble colours like some other clays.
I think once you have tried this, you'll realize how much can be done with very little in the way of tools, and there's some inspiration for more finger and toothpick adventures at the end.

 
Here's the dolphin with some other finger and toothpick creations I've made.
The Mermaid, Fish in the Sea and the Little Fan Fish are polymer clay, 
the Flower necklace and Vessel are cold porcelain

All rights reserved. This tutorial is free for personal use, 
it may not be used or reproduced for any commercial purposes or altered without seeking and receiving prior permission from the author.
If you liked this post why don't you share it - use the button below